How to improve architectural CAD drawings (CAD skills + ArchiCAD template)
- Dominic Sifo
- Apr 12, 2020
- 5 min read

Architecture projects go through a design process, a process that documents the project path from design to construction. It starts first with sketching to resolve and address issues from the client’s functional requirements in the project brief. This is where the project is getting birth.

They have been the evolution of Architectural drawings in CAD programs to accelerate the project development process several times and making it more accurate.
The Use of a Template
So to get started, we use ArchiCAD software, and we always utilize the use of a template to have an immediate project startup with preset views, layouts and set of drawings. This helps to reduce repetitive work to increase productivity and the efficiency of producing architecture drawings. The template is a project file structure that has stored data in all 3D and 2D tools saved as favorites.

This data revolves in all operations you are going to carry from sketching, design, and construction. If you draw a wall in plan view. In this operation, we use wall tool that contains commonly used presets, presets of parameters like the wall thickness, height, specifications of wall materials, classification and trade code, graphic display in floor plan and section drawings, last but not list, composites that represent the construction methods of the wall.
Demonstration instructions:
In this template, all this parameter data is stored and saved as favorites in all object and tool settings, If you go through all these parameters they are embedded information as to their categories of class from wall settings.
Open classification and properties section, there are various data in this section and be aware that this is the data we are pulling out to produce:
Schedules, Quantities, And annotations in views that we are going to demonstrate in a minute.
Under classification, they are custom made classes of building elements. A wall is under Masonry class, and then the trade code is B Superstructure, Description and specifications of the brickwork, rate and cost value just to mention the few from the list.

Other important parameters are under main construction, we got a list of construction type of our wall, and then you can add reinforcement and others from the list.
This data is being used to automate some of the annotation processes in sections and details views, also extracting documents like schedules and quantities. Without a doubt, these streamline modeling and production of drawings.
Annotation:
In this template the annotation process is automated. This is data embedded in object classification and properties we are using. Use label tool and pick saved labels from favorites to speed-up the workflow. Follow this instruction in this video

The settings of these tools have been modified for you to use. Click on the wall to place annotation, In this case, we are going to annotate the plaster, Corebrick, and reinforcement material of this brickwork.

All this information and process is saved and stored as presets for you. You don’t have time to start editing and tweaking these complex settings. For example, let’s annotate a complex view like a section. Place labels in each of the elements in this view to add your annotations. The label knows what type of data to place for each element. Isn’t this magical?
Scheduling:
In this workflow, schedules are powerful documents in the accuracy of the building cost. The template offers a system that links these documents to extract data from all objects that assemble your building.
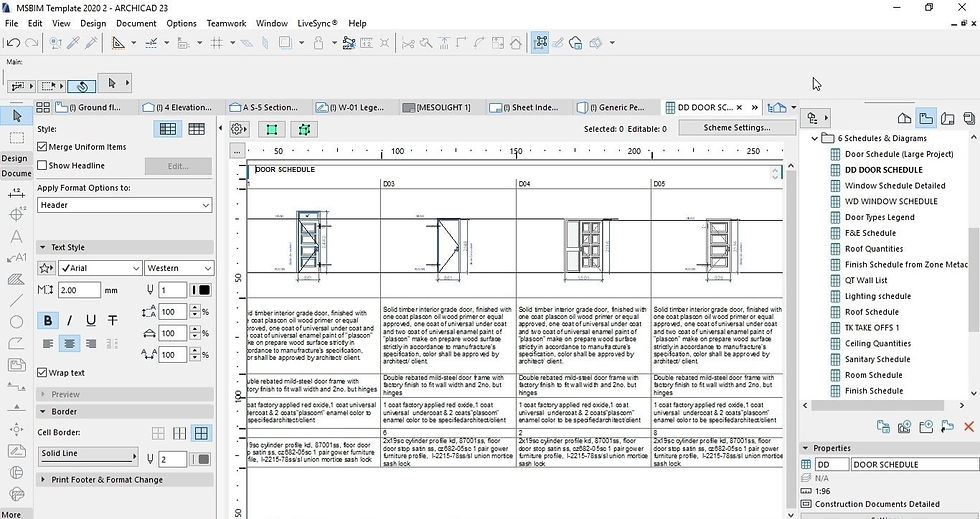
For example, let’s use a common schedule like a door schedule. Watch this video for this demonstration. Notice that information that appears here is from classification and prosperities of stored parameter data from door settings, if I select one of the doors, and pick the first green button to access the door from the floor plan and then door settings under classifications and properties section. The class is the door, trade code F Carpentry, Joinery & ironmongery, Description and specification data, The cost of the door and many more like frame, hardware set to glazing not forgetting the manufacture/supplier’s section.
Elevation:
The drawing background:
The background is used to put your drawings into context by adding the scene and highlight to the subject.
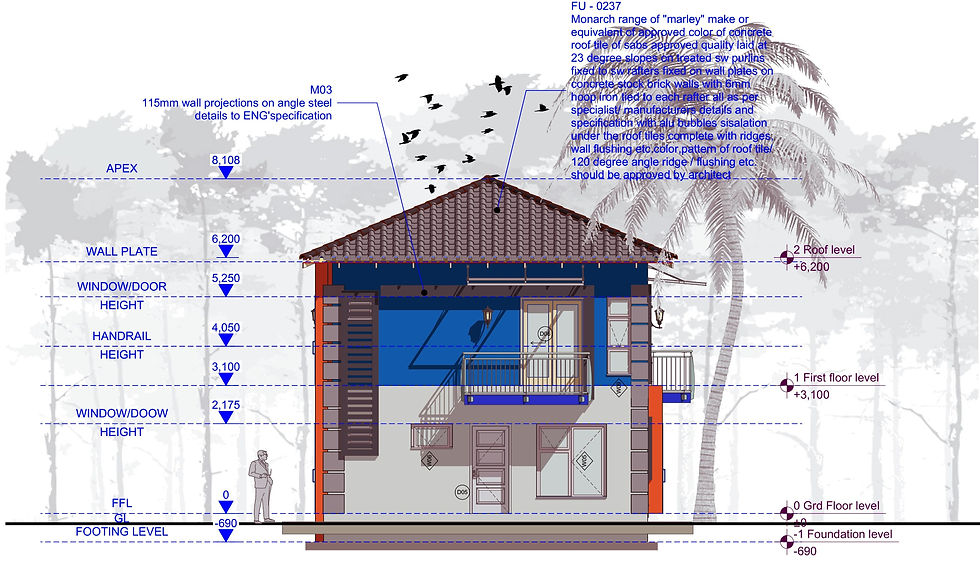
It also helps to enhance the subject and its environment. This will allow the human eye to distinguish different elements and determine depth in the drawing.
Use fill with solid white background to trace the contour edge of your elevation. Watch this video to follow the instructions. Open the view settings of the elevation, Go to model display, in the model display section, the uncut elements represent surfaces of the current view of this elevation.
Underfill the uncut surfaces part, use surface color (non-shaded) of the model.
Check vectorial 3D hatching to representing materials.
Also, Check SHADOWS and make sure to control the intensity to give the drawing depth and value. You can spice it up with graphic overrides.
Add human figures and other necessary 2D information. E.g Birds and trees to add scale
3D Documents:
We came to the end of this article but, I want to show you the last tip in 3D document creation. We are going to do it in style and let's create something like this;

Watch this video to follow the instructions. I will add the missing part of the roof by the accessories tool from the design menu, design extras, accessories and roof accessories.
This tool allows us to add a 3D detailed roof in the model. Go to roof plan; draw portions we are going to cut the roof to have a cut view detail by using slab tool. Use solid element operations to subtract both slab potions to create a cut in the roof and then hide both the slabs. Marquee the potion and 3D view you want to show, Convert the view into a 3D document and save the view. Go ahead and place annotations as we did previously.
Benefits of the template
By concluding this article, The following are the benefits that the templates offer to improve the quality of your architectural drawings:
• It allows you to perform and extract data of take-offs with predefined Schedules.
• Become consistent with modeling and data input based on predefined Favorites.
• The ability to streamline modeling and annotation
• Automation of documents, presentations and data output
• It’s easy for you and staff to learn and use
• The template utilizes best practice workflows
• Save lots of time and reduce repetitive works by saving presets with data stored in it.
• Last but not list, the template lets you think about architecture and design, look at design large issues without the headache of 2D stuff and time-consuming operations.
We will talk more next time in-depth in some of the specific components of the template, in how we can harness the power of ArchiCAD in architectural concept and presentation drawings. If you want this template DOWNLOAD HERE


Comments